CAD Model-Based Planning and Vision guide Accurate Geometric Measurement
by Heikki Ailisto
The geometric accuracy of manufactured objects affects both manufacturing costs and quality. Control over the geometric accuracy of products is seen as an important issue in the construction of machinery, cars and ships, for example. This control can be achieved by measurements of dimensions and the coordinates of vital points, for instance, but measurement planning is needed to ensure that the goals are reached in an efficient manner.
Laser rangefinding or LIDAR is an excellent technique for measurement of dimensions and shapes, since it is accurate, fast and has a large measuring range. Typically, the laser range measurement is combined with very accurate angle measurement, servo motors for panning and tilting the measurement beam and sophisticated computer control. The x,y,z coordinates of the measured point can be calculated from the measured range, pan and tilt values. Repeatability of 1 mm can be achieved in good conditions within a measuring range up to 20 meters. Commercial systems specially designed for wear monitoring of converters and ladles used in steel making and for ship building industry have been developed in Oulu, Finland in cooperation between University of Oulu, VTT Electronics and hi-tech companies.
Measurement Planning based on CAD Data
The widespread use of computer aided design and manufacturing has led to a situation in which product geometries are available in electronic form and machines and measurement devices are controlled by computers. At the same time, the design and manufacturing staff are becoming familiar with the use of computer aided techniques in their everyday work. This is opening up a path for developing CAD-based measurement planning systems serving the purposes of geometric control.
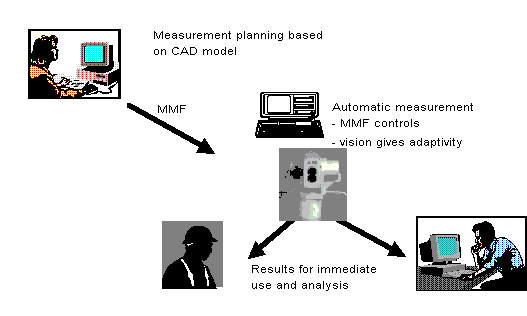
In this work a concept of CAD model-based automated 3D measurement was developed (see Figure 1) and its feasibility demonstrated by implementing and testing experimental systems for two cases drawn from industrial needs. Cases from shipbuilding and steel making were considered.

Figure 1: Concept of CAD model-based automated 3D measurement.
A CAD compatible tool for measurement planning and analysis was implemented. The tool imports CAD files of the objects or products to be inspected and offers the user various graphical means for measurement planning. The result of the measurement planning is a special command file for controlling the optical coordinate measurement system.
Vision Sensor finds Vital Points to be measured
The LIDAR based optical coordinate measurement system is excellent in measuring 3D coordinates of single points. However, it lacks the ability to find the point of interest in a changing environment where, for example the position of the measured object may vary. This ability would be valuable in automating the measurement function so that points marked with special targets or points with visible features, like corners, could be measured without operator intervention.
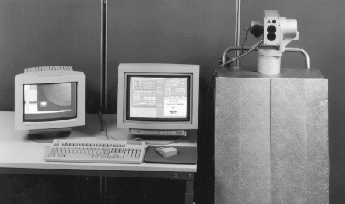
We implemented an auxiliary vision sensor for controlling LIDAR based optical coordinate meters. A CCD camera is placed either on the same optical axis with the laser range finder or paraxial with the measurement head. A vision system analyzes the view of the camera and finds predefined target points or visible features, and then guides the pan and tilt motors so that laser range finding can be focused on these points. Pointing accuracy better than 1 : 20000 was achieved with the prototype system within a measurement range of 16 meters. A LIDAR based coordinate measuring system equipped with vision is shown in Figure 2.

Figure 2: A LIDAR based coordinate measuring system equipped with vision.
CAD Model-based Automated Measurement Feasible
The feasibility of the concept of automated 3D measurement was demonstrated by following the whole operation chain (as seen in Figure 1) of the system from measurement planning to comparison between as-measured and as-designed values in examples involving planning the measurement of targeted points in a large hall, measurement of a curved shell plate used in shipbuilding and view point planning for refractory lining monitoring measurements. The operating principle was found to be sound, but certain limitations emerged, some of which were due to features of the CAD system. Further work with measurement planning tools is required, eg in order to improve their user interface and to incorporate tolerancing in measurement planning.
When considering further development of the vision system, it would be beneficial to integrate it with the 3D measurement system, since this would lead to a less costly, more compact and more reliable solution. Interesting possibilities are offered by integrated vision systems, which have the capabilities of a video camera, frame grabber and processor in the same package.
Some of the ideas and solutions developed in this work are already being utilized by industrial companies. Vision is being used for coordinate system set-up in a laser profiler-based measurement application in steel manufacturing and development work in this field is continuing. Work on the measurement planning tool is also going on, and the tool is being adapted for photogrammetry applications.
Please contact:
Heikki Ailisto - VTT Electronics
Tel: +358 8 551 2111
E-mail: heikki.ailisto@vtt.fi
